Introduction to Evidence
- Heather Wallander
- Aug 3, 2024
- 2 min read
Evidence items are the documents and files you have in your possession that support your description of an incident.
Changes made via the web and mobile will be synced automatically, so that your account information is the same across devices.
Looking for something specific? Jump to your desired section
Create New Evidence
Edit Evidence
Delete Evidence
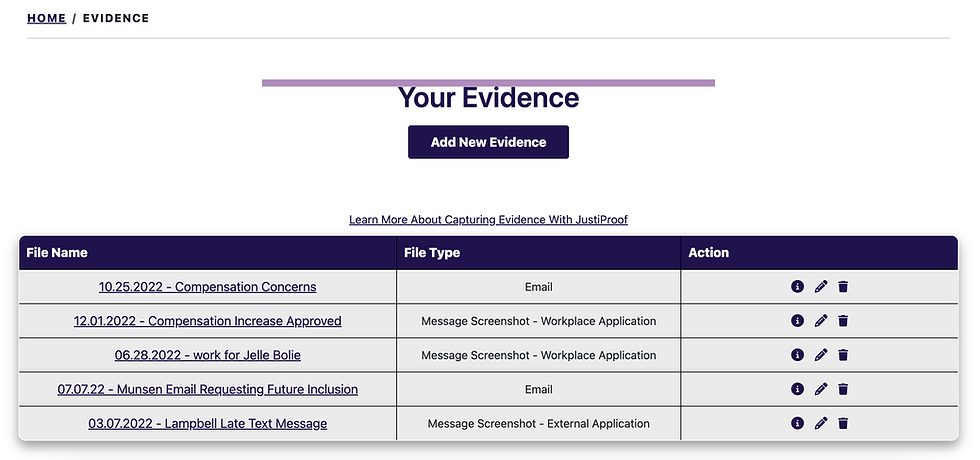
JustiProof Evidence View
Web Browser: If logged in, you can access evidence two ways:
Navigating to Build You Case > Evidence
The following url: https://app.justiproof.com/evidence/
Mobile: If signed in, you can access evidence two ways:
App Home Screen > Evidence
Select Evidence tab from App Navigation (Bottom of Screen)
From the Evidence View you can create new Evidence or modify existing Evidence

Create New Evidence
Once a new item of Evidence has been created, it will be listed in the Evidence drop down as an option to be added to an Incident.
Steps to Create New Evidence
From Evidence View > Select Add New Evidence
Enter File Name: Title for the item of evidence
Example: XX-XXXX - Short Description (e.g. 10.2024 - Email Discussing Promotion)
Select File Type:
Message Screenshot - External Application
Message Screenshot - Workplace Application
Email
Calendar Invite
Performance Document
Compensation Document
Recording
Policy Document
Other
Upload Evidence
Web: Choose File and select Evidence File to upload from computer
Mobile: Select New Set of Images > Select up to 5 images > Select Evidence Image
When finished, select Create Evidence

Edit Evidence
Editing Evidence will automatically apply the changes to any Incident and Timeline it is assigned to, so that the change is reflected the next time you generate a Timeline Report.
Steps To Edit Evidence
From Evidence View > Click Pencil Icon (web) or Edit Evidence (mobile)
Make any needed changes
Note: File Preview only available for images and on the Web (Browser) Application
Select Save Changes (web) or Update Evidence (mobile)

Delete Evidence
Deleting Evidence will automatically remove the file from any Incident or Timeline it is assigned to. The evidence will no longer appear on your Timeline Report once a new export is generated.
Steps To Delete Evidence
From Evidence View > Click Trash Icon (web) or Delete Evidence (mobile)
Confirm you want to delete the evidence by selecting OK (web) or Delete (mobile)
You will be returned to the Evidence View
.png)
Comments